Table of Contents
Archived post - content may be outdate
This is the fourth part of a series of articles, part 1 (basics and background & part 2 (preparing your environments) & part 3 (working with solutions) were published before.
Pipelines in the Power Platform strive to make application lifecycle management (ALM) more accessible for Power Platform and Dynamics 365 customers by incorporating ALM automation, continuous integration, and continuous delivery (CI/CD) capabilities into the service in a way that is user-friendly for all creators, administrators, and developers.
Pipelines considerably lessen the effort and specialized knowledge previously necessary to achieve the return on investment (ROI) from adopting efficient, automated ALM processes within your team or organization.
-
Administrators can effortlessly set up automated deployment pipelines in minutes instead of days or weeks.
-
Makers benefit from an intuitive user experience, enabling them to deploy their solutions quickly.
-
Professional developers can extend and execute pipelines using the Power Platform command line interface (CLI).
The idea behind
Admins centrally manage and govern pipelines
Pipelines enable administrators to centrally manage and supervise citizen-led and professional developer-led projects on a large scale with minimal effort. Admins implement appropriate safeguards that guide and support solution development, testing, and delivery across the organization.
Additional advantages for admins encompass:
Reduced total cost of ownership:
-
Pipelines greatly enhance the productivity of makers, developers, and administrators. They enable your business solutions to reach the market more quickly and with better quality while following a secure and well-governed process.
-
Effortless implementation of secure and customized change management processes across your organization or team.
Save time and money:
- The system handles the heavy lifting and continuous maintenance, allowing you to focus on other tasks.
Scale ALM at your own pace:
- Regardless of where you are in your ALM journey, you can expand pipelines to accommodate your evolving business needs. We strive to make this upward transition as seamless and effortless as possible.
Achieve compliance, safety, monitoring, and automation goals by utilizing:
-
Achieve compliance, safety, monitoring, and automation goals by using:
-
Secure production environments through approval-based delegated deployments.
-
Customizations and audit logs are automatically saved and easily accessible.
-
Out-of-the-box analytics offer enhanced visibility from a central location.
-
View out-of-the-box Power BI reports within the pipelines app or create your own.
-
Customize pipelines with pipeline extensibility and Power Automate to meet your organization’s needs.
Makers run pre-configured pipelines.
Once pipelines are established, makers can initiate in-product deployments directly within their development environments with just a few clicks. Other benefits for makers include:
-
No prior knowledge of ALM processes or systems is required. Citizen developers often perceive pipelines as a guided change management process.
-
Solution deployments are pre-validated against the target environment to prevent errors and increase success rates. For instance, missing dependencies and other issues are detected before deployment, and makers are immediately guided to take the appropriate action.
-
Connections and environment variables are supplied and validated before the deployment commences.
-
This ensures that applications and automation are deployed without manual post-processing steps and are connected to the appropriate data sources within each environment.
-
Admins can even preconfigure specific connections that will be utilized.
-
Developers can use and extend pipelines.
Professional developers have become more productive with pipelines now managing complex background operations. Instead of executing various underlying tasks to achieve their goals, developers can instruct the system on what they want to accomplish. By using the Power Platform CLI, developers can:
-
List pipelines to view relevant details, such as the stages and environments ready for solution deployment.
-
Deploy a solution with a single command:
- With pipelines, developers only need to provide the necessary parameters, and the system orchestrates all end-to-end deployment operations in compliance with organizational policies.
-
There is no longer a need to connect to multiple environments, export solutions, download solution files, manually create connections, populate deployment settings files, import solutions, or handle other tasks previously required.
Moreover, developers can extend pipelines and integrate them with other CI/CD tools.
Deploying the solution “Power Platform Pipelines”
Deploy the pipeline solution in your production environment.
-
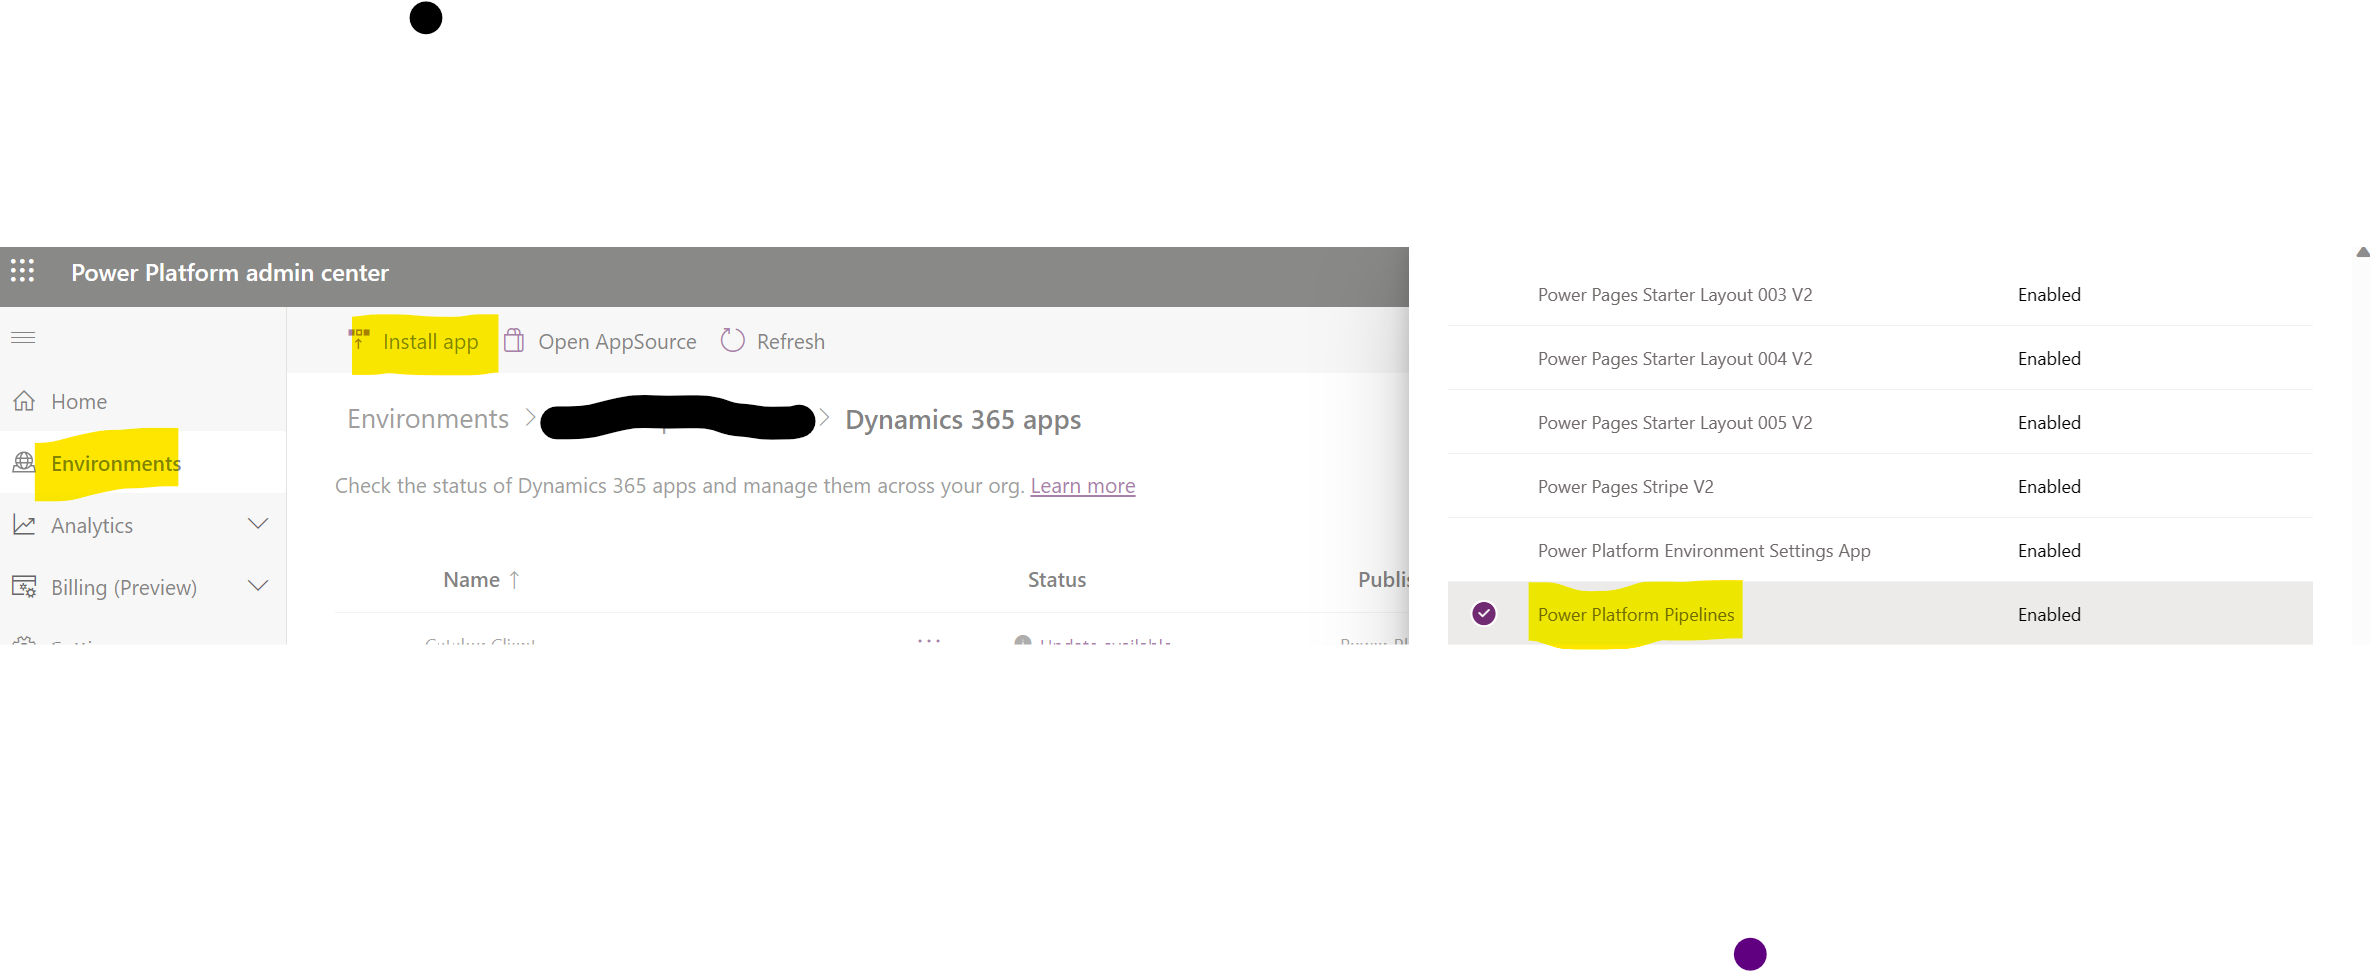
Go to the Power Platform Admin Center
-
Select the “Production environment”
prodyou created earlier. -
In the command bar at the top, click on “Resources” and “Dynamics 365” apps.
-
You will find the apps installed on your “Production environment” by default.
-
Click the “Install App” button in the command bar at the top.
-
In the sidebar that appears, scroll down and select the “Power Platform Pipelines” app.

-
Then, click the “Next” button at the bottom of the sidebar.
-
Next, agree to the terms and click the “Install” button at the bottom of the sidebar.
-
This process will take a few minutes.
You can refresh the page by clicking the Refresh button in the command bar at the top. Once completed, go to the maker portal and select the correct environment (Production). If everything went smoothly, you should see the Deployment Pipeline Configuration app in the Apps section of the maker portal.

Create a new Pipeline.
-
Make sure to select that app in the maker portal and make sure press the “play” button to open the app.
-
This will open the app in a new tab.
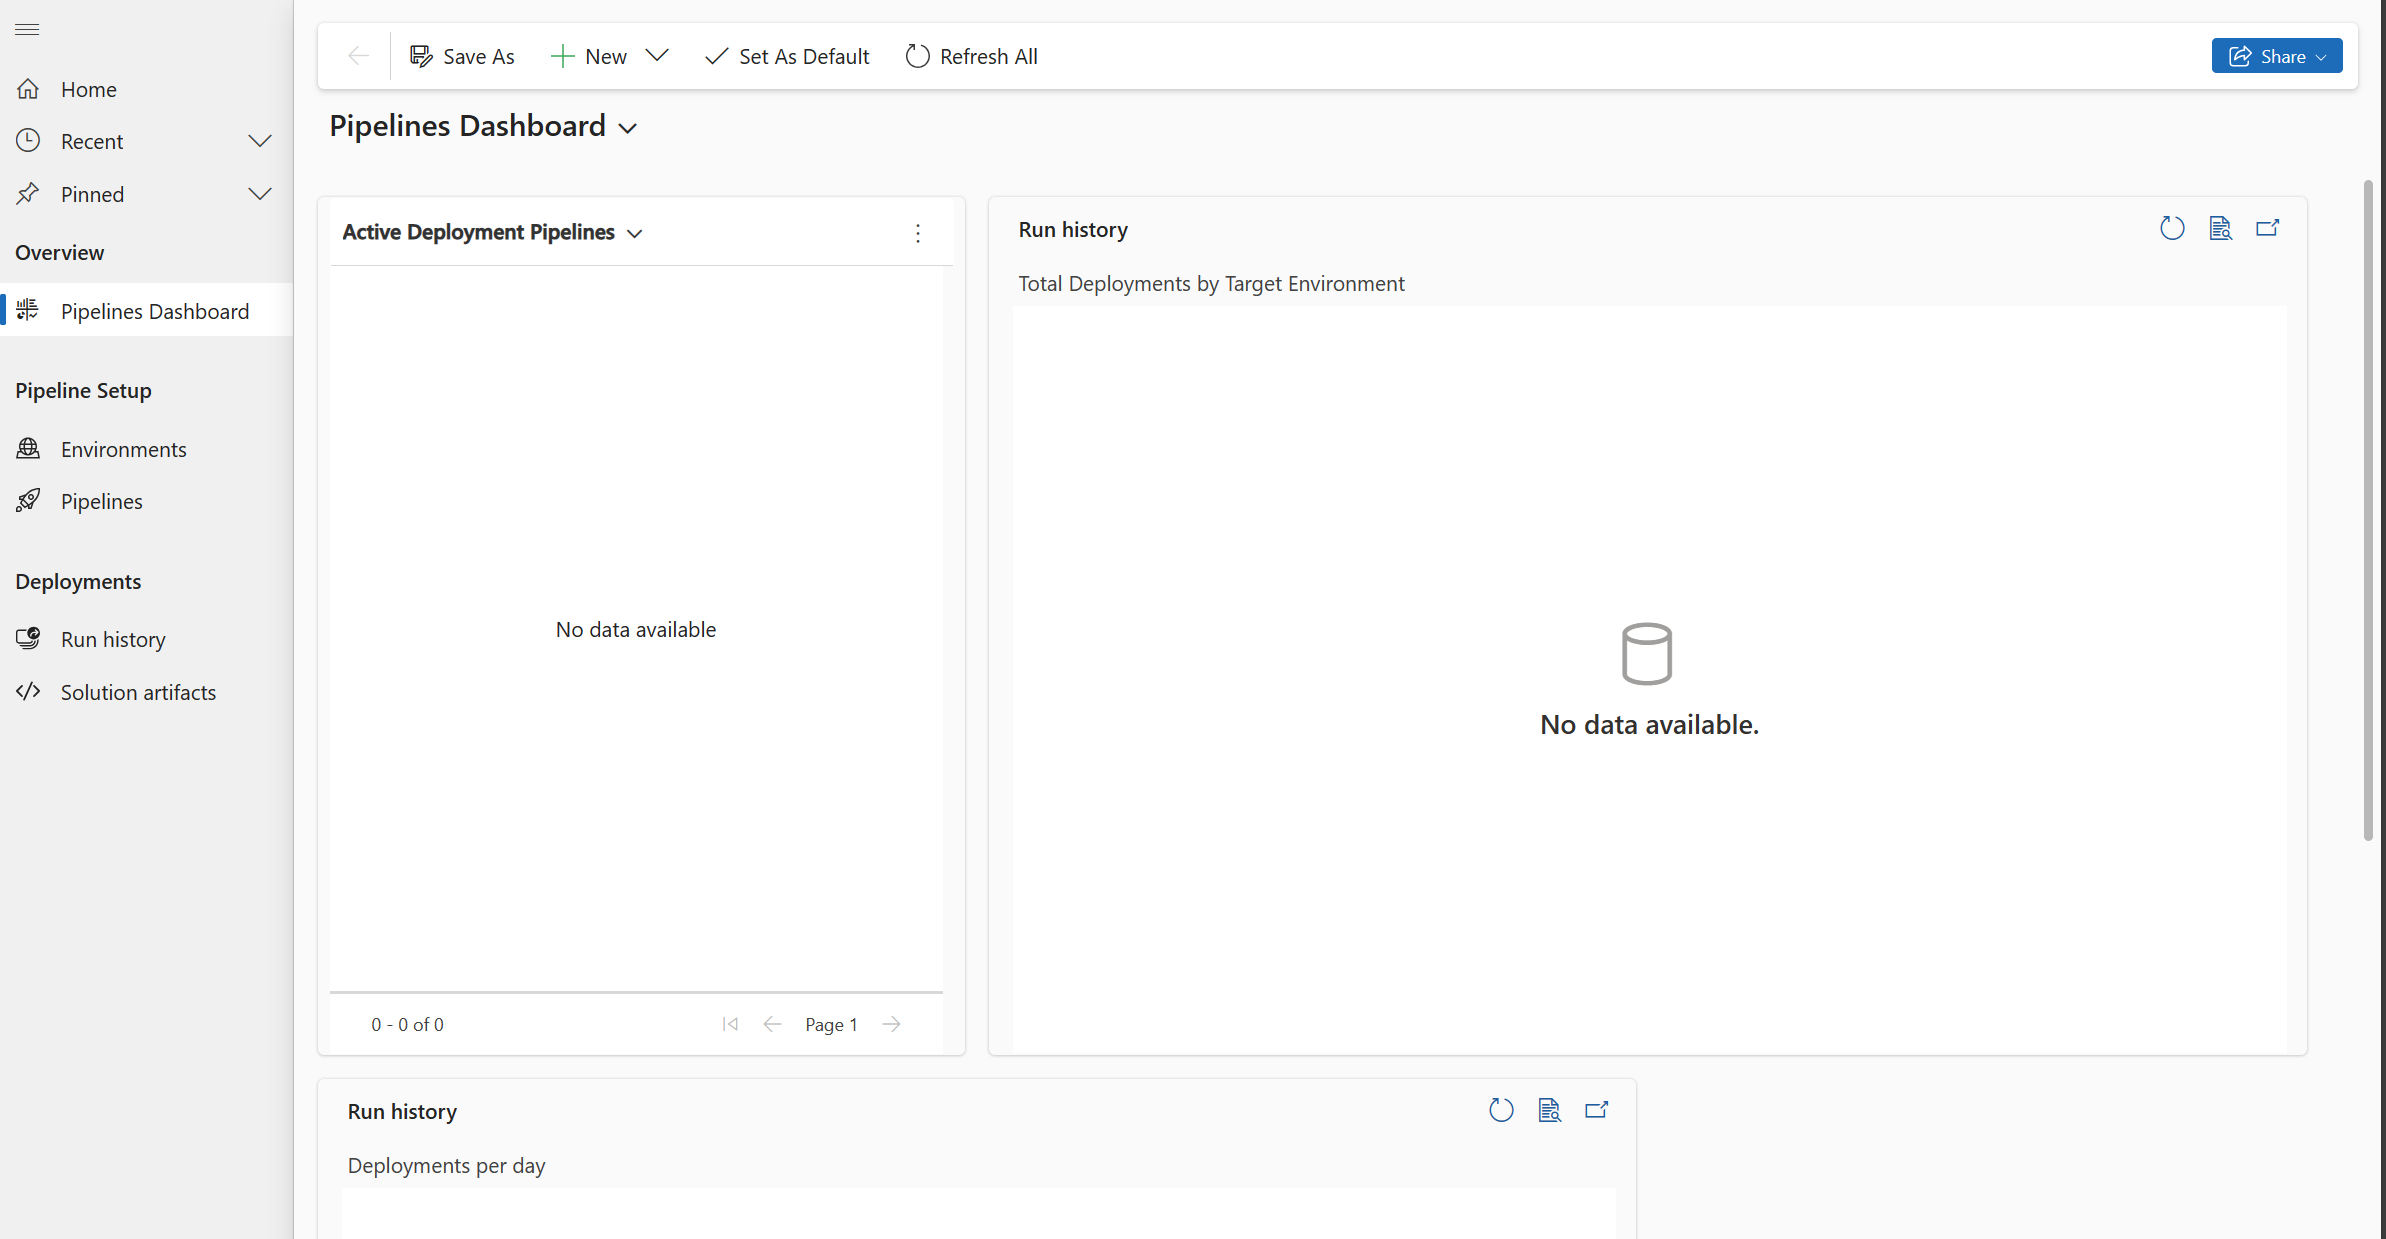
Familiarize yourself with the app by exploring the available menu items:
First is an Overview section, where you arrive when you open the app. This is the Pipelines Dashboard, which displays the latest information about active runs and pipelines. When you open this for the first time, it’s expected to be empty, so don’t worry!
There is also a Pipeline Setup section to view your environments and pipelines.
Lastly, a Deployments section allows you to view the run history and find solution artifacts.

create a new pipeline by selecting three dots and then the “+ New” button on the “Active Development Pipeline” Dashboard

create a new pipeline by selecting the new button on the Pipelines Dashboard.
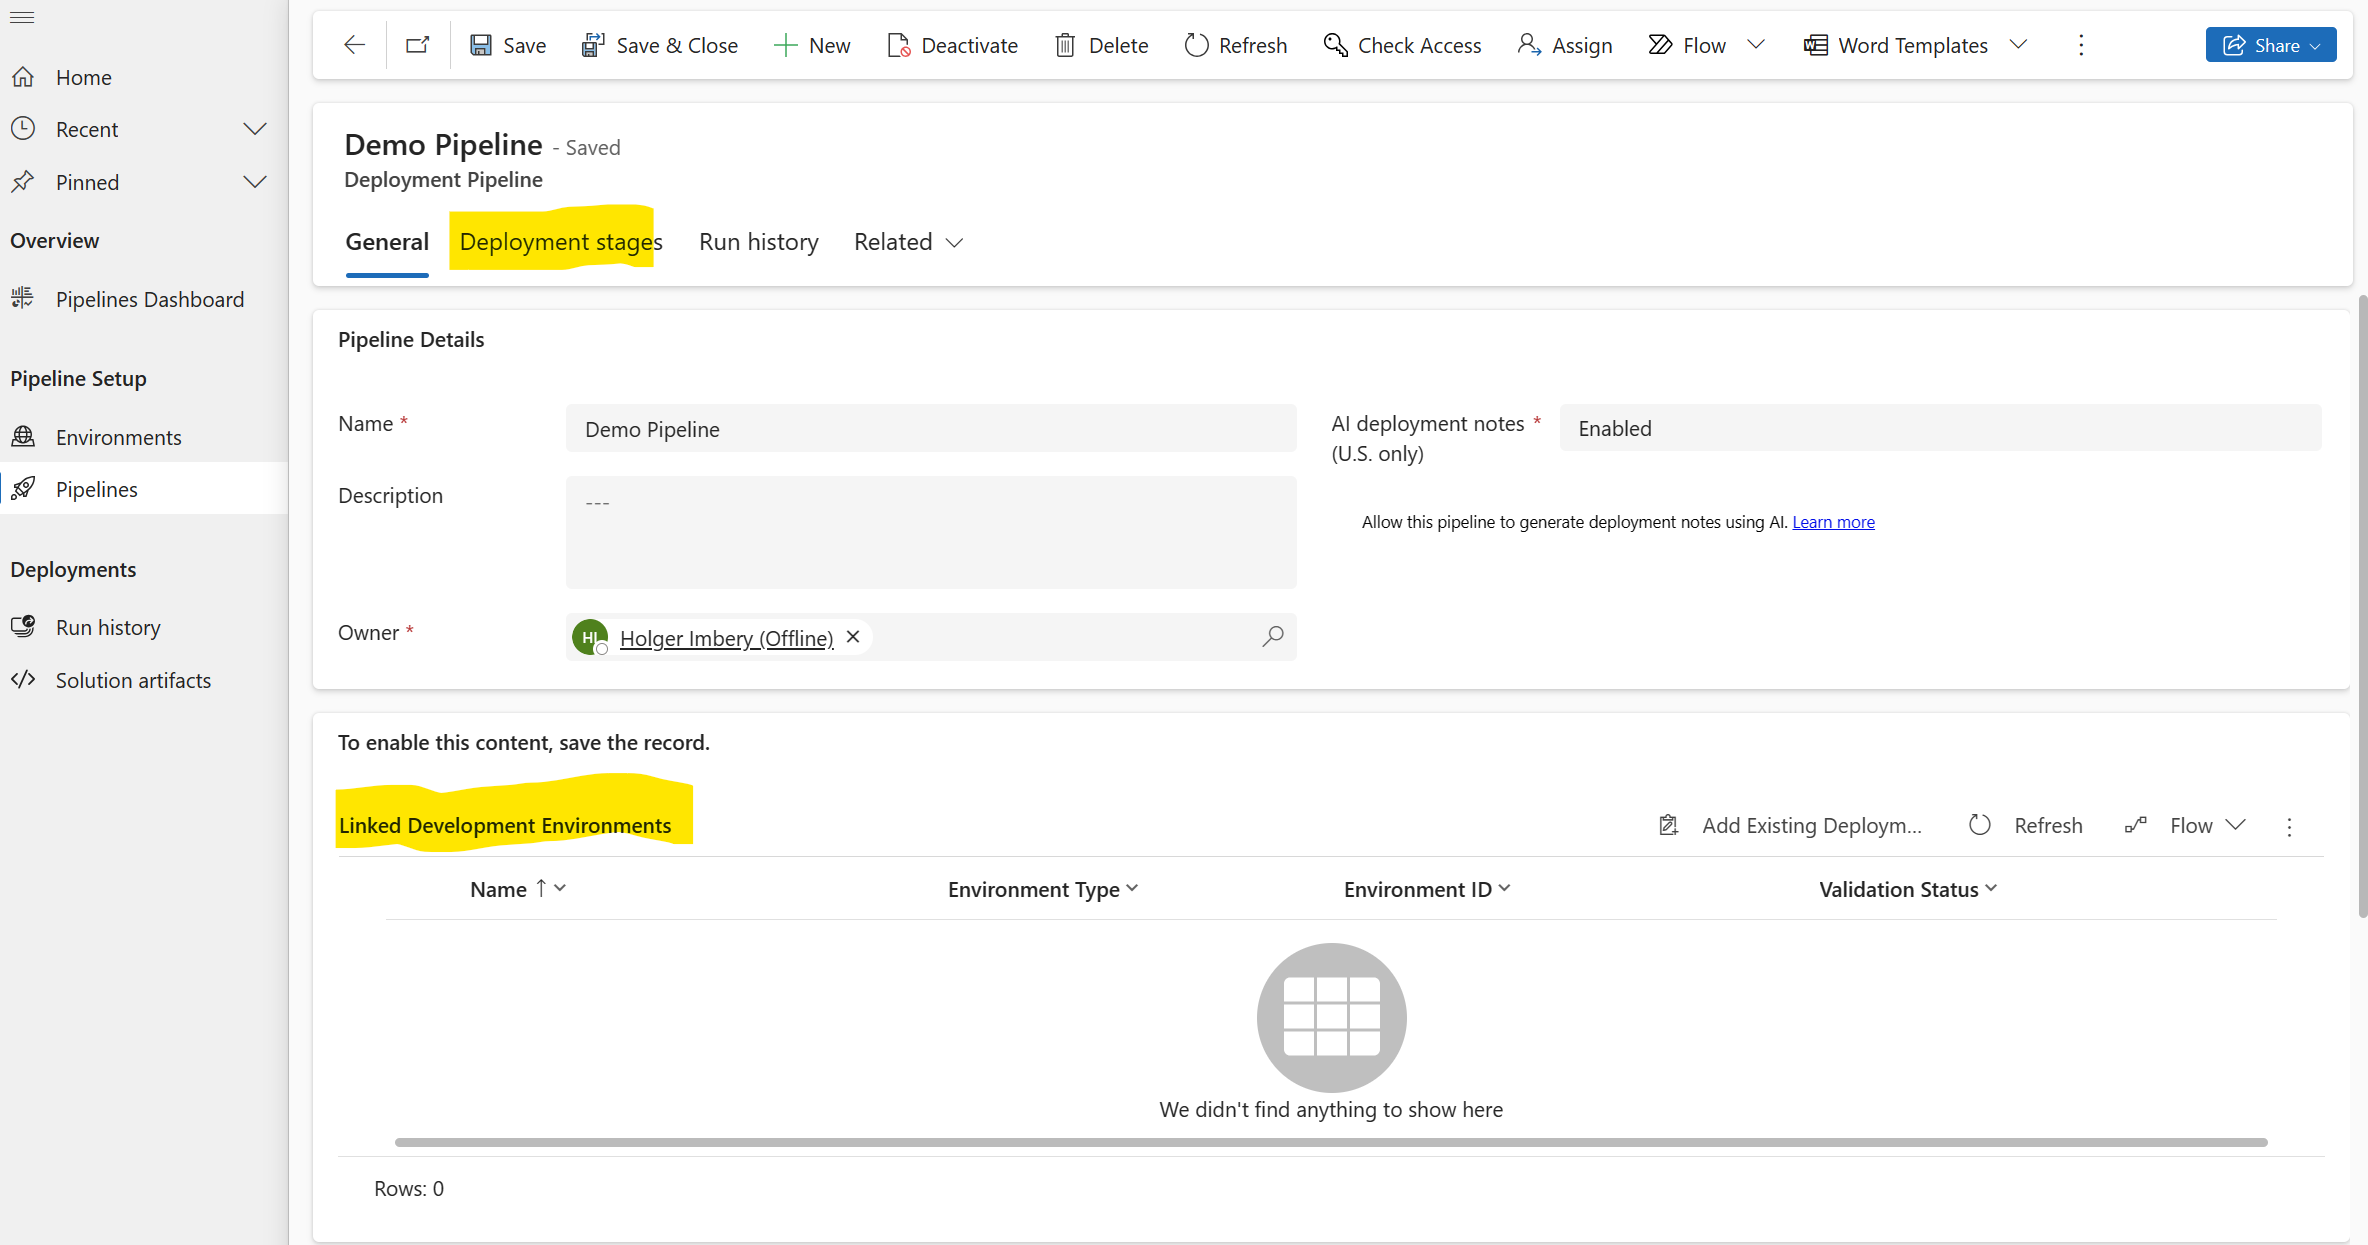
The result should be similar to the screenshot below

As you can see, there are two sections: Linked Development Environments and Deployment Stages.
Linked Development Environments
A pipeline can be accessible for multiple development environments, which is highly convenient when utilizing various development environments alongside shared testing and production environments.
Deployment Stages
The Deployment Stages section allows you to add stages following your development environment. For example, we will add a stage called “Deploy to Test” and another called “Deploy to Prod.” The outstanding feature is that we can set preceding stages for these stages. This ensures that “Deploy to Test” occurs first and “Deploy to Prod” comes second.
Add development environment
Add or create a development environment with the respecting buttons and find the result similar to the screenshot

Create stages
Create your first stage, “deploy to test,” via “+ New Deployment Stage.”

the process is self-explanatory

Ensure you click the “New Deployment Stage” button again to add a second deployment stage called “Deploy to Prod”. Follow a similar process as above, but select the Previous Deployment Stage and search for the “Deploy to Test” stage.
The two-stage process provides a robust and efficient workflow for “citizen developers”. Initially, the developers can create and refine a solution within a dedicated development environment. This isolated environment is explicitly designed for development, allowing developers to experiment and innovate without affecting the live systems.
Once the solution is developed and ready for testing, it can be seamlessly transferred to a test environment. This environment replicates the production environment but uses test data instead of actual production data. This ensures that the solution can be thoroughly tested under conditions that closely mimic the production environment without the risk of affecting real-world data or operations.
After rigorous testing, once the solution has been confirmed to be working as expected, it can be moved to the production environment. The solution will interact with actual production data and be utilized in real-world scenarios. This systematic approach ensures potential issues are identified and resolved during the development and testing stages, minimizing the risk of disruptions or errors in the production environment.
This two-stage process ensures the quality and reliability of the solutions developed and provides a safe and efficient way for “citizen developers” to innovate and improve their systems.
Run your Pipeline
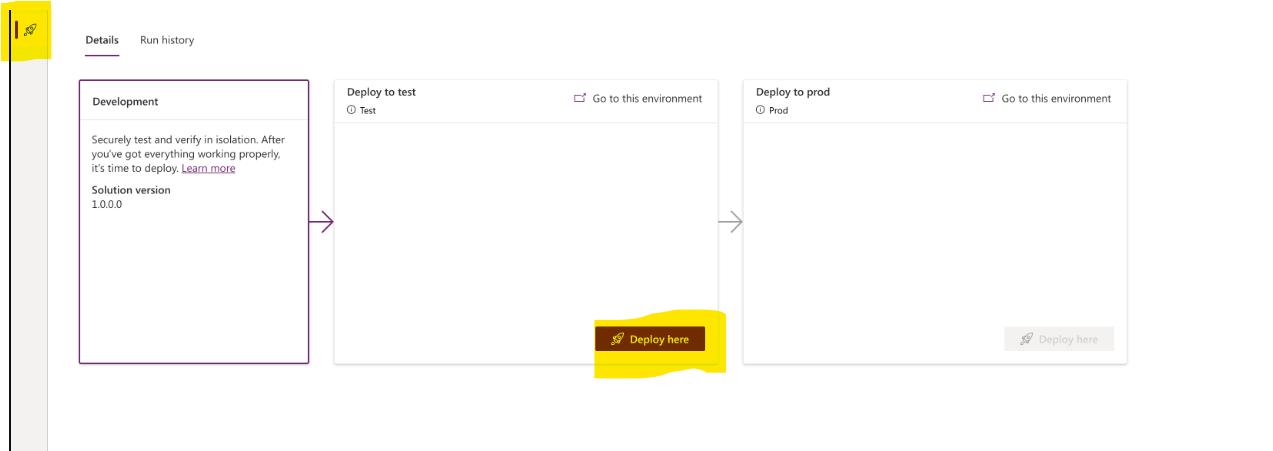
Select your solution in your development environment and press the “rocket” symbol to fire up your pipeline.

Similar to “deploy to prod”
Next steps
As mentioned earlier, we always begin with the basics and gradually delve deeper into the topic throughout the series. We started with pipelines using a graphical interface based on the “Power Platform Pipelines” solution. Later, we will explore managing this through CI/CD pipelines using GitHub Actions.
Conclusion
Mastering ALM for Microsoft Power Platform involves working with pipelines to simplify and streamline the application lifecycle management process. This comprehensive guide covers the concept of pipelines, their benefits for administrators, makers, and developers, and the steps to create and run them. By leveraging pipelines, you can efficiently manage your Power Platform solutions and ensure a smooth transition from development to testing and production environments.


Start the conversation